

A fresh coat of paint does more than beautify your home. It is a cost-effective way of protecting your home’s exterior surfaces against the elements, preventing issues in the future, boosting its curb appeal, maintaining its structural integrity, and increasing its property value. It can also help you save energy and personalize the look of your home.
Surface prep work is not that complex. However, this step also takes up the most significant portion of any paint project. This is why many homeowners would rather skip this step and go straight to paint the walls. However, painting on dirty, damp, and damaged walls may lead to more surface paint issues, such as adhesion failure, peeling, cracking, and blistering.
Proper surface preparation before painting is crucial to enhancing the durability and appearance of the exterior paint job. Cleaning the surface, repairing its flaws, sanding, and priming allows the topcoat to adhere to the surface properly and evenly, resulting in a smooth and durable paint finish.
That’s why, before starting work, it’s crucial to assess your home’s exterior so that any damage can be identified and addressed before painting.
Assessing your home’s exterior
Importance of a thorough assessment
Thoroughly assessing your home’s exteriors before painting is crucial for several reasons, such as ensuring the durability and longevity of the paint job, optimal use of resources, and enhancement of the property’s aesthetics and value. It helps identify flaws, cleaning, repairing, and preparation needed before painting.
Not all homes are the same. The exterior surfaces of these homes are made of various materials requiring specific paints or other finishes for optimal performance. A thorough evaluation helps you select the right products best suited for the conditions and materials of the home’s exterior, ensuring the paint job will be durable, last longer, and protect your home effectively.
Outdoor temperature and humidity are the most significant factors influencing exterior painting. Understanding the weather patterns and local climate is crucial for planning the most optimal time to paint and selecting the correct type of paint. For instance, some paints are formulated for high-humidity environments, while others are for UV radiation resistance. A thorough assessment of your home’s exterior surfaces includes considering those factors to ensure the paint will withstand temperatures and local weather conditions over time.
Identifying areas in need of repair
Before painting exterior siding, it’s crucial to identify any problem areas to ensure a smooth and long-lasting finish. Here are some common issues to look for:
- Cracks and gaps – Inspect the siding for cracks, gaps, or holes where moisture can penetrate. These areas must be filled and sealed before painting to prevent water damage.
- Peeling or flaking paint – If the existing paint is peeling or flaking, it must be scraped off completely before applying a new coat. Failure to do so will result in the new paint layer also peeling or flaking prematurely.
- Mold or mildew – Check for any signs of mold or mildew growth on the siding. You can usually detect them by their black or green spots. Clean the affected areas thoroughly and use mildew-resistant paint to prevent future growth.
- Rot or decay – Inspect the siding for any signs of rot or decay, especially in wooden siding. Soft spots or areas that crumble when touched indicate rot and should be repaired or replaced before painting.
- Warping or buckling – Warped or buckled siding can indicate underlying moisture issues or improper installation. Address any structural issues before painting to ensure a smooth surface.
- Fading or discoloration – Over time, exterior siding can fade or become discolored due to exposure to sunlight and weather. Consider power washing the siding to remove dirt and grime before painting, and choose a high-quality paint that offers UV protection to prevent future fading.
- Insect damage – Look for signs of insect damage, such as holes or tunnels in wooden siding. Treat the affected areas and repair any damage before painting.
- Chalking – This problem occurs when the paint deteriorates, leaving a powdery residue on the surface. Chalking can affect the adhesion of new paint, so it’s essential to properly clean and prime the surface before painting.
- Caulk failure – Check the caulking around windows, doors, and trim for any signs of cracking or deterioration. Reapply caulk as needed to ensure a tight seal and prevent water infiltration.
- Highlight natural wood grain and shield decks or fences with premium exterior staining treatments.
By thoroughly inspecting the exterior siding for these common problem areas and addressing any issues before painting, you can ensure a professional-looking finish that will stand the test of time.
To DIY or hire a professional?

Deciding whether to DIY or hire a professional painter to paint your home’s exterior depends on various factors such as your budget, time availability, skill level, and the size and complexity of the project. Here are some advantages for each option:
DIY:
- Saves costs – DIY painting can save you money on labor costs, as you won’t have to pay a professional painter.
- Gives personal satisfaction – Completing a painting project on your own can be personally rewarding and give you a sense of accomplishment.
- Allows flexibility – You can control the schedule and work at your own pace.
- Can be a learning experience – DIY painting can be an opportunity to learn new skills and gain experience in home improvement projects.
Hiring a professional:
- Gives quality results – Professional painters have the expertise, tools, and experience to deliver high-quality results efficiently.
- Is time-saving – Professionals can complete the job quicker than DIYers, allowing you to enjoy the freshly painted exterior sooner.
- Offers convenience – Hiring a professional painter means you don’t have to worry about purchasing supplies, setting up equipment, or spending hours on the project.
- Provides warranty – Many professional painters offer warranties or guarantees on their work, providing you with peace of mind.
Ultimately, deciding between DIY and hiring a professional painter depends on your priorities, budget, and available time. If you have the skills, time, and willingness to tackle the project, DIY painting can be cost-effective. But if you prioritize quality, convenience, and time-saving, hiring a professional painter may be the better choice. It’s essential to weigh the pros and cons carefully before deciding.
Homeowner’s responsibilities before exterior painting
Even if you have hired professionals to do the job, you still can play a crucial role in the project. As a homeowner, you know the ins and outs of your property, so you also know how to clear the worksite of any impediments and prepare it for exterior painting.
Your responsibility is to clear the worksite of obstructions before the painters arrive at your property. Doing so is essential for the safety and efficiency of the painters. Here’s a step-by-step guide on how to do it:
- Inspect the area – Walk around the exterior of the building to identify any potential obstructions, such as furniture, garden hoses, decorations, outdoor equipment, or vehicles, that could hinder the painting process.
- Remove furniture and decorations – Move any outdoor furniture, decorations, potted plants, or other items away from the walls to be painted. Store them in a safe location where they won’t be in the way or at risk of paint damage.
- Clear the pathways – Ensure that pathways leading to the worksite are clear of any debris, toys, tools, or other objects that could pose a tripping hazard or impede the movement of the painters and their equipment.
- Trim vegetation – Trim back any bushes, shrubs, or overhanging branches that may obstruct access to the walls or interfere with the painting process. This step includes cutting back vegetation that may be touching or too close to the building.
- Turn off your sprinklers – If your sprinkler system has a set timer, ensure it is turned off before the paint crew arrives at your home to start painting. You don’t want them to get soaking wet, and you surely don’t want some water drips or streaks landing in the paint finish.
- Secure loose items – Secure any loose items, such as outdoor light fixtures, downspouts, shutters, or screens, that could be damaged or become a hazard during the painting process. Remove any fragile or valuable items that could be accidentally bumped or knocked over.
- Cover sensitive areas – Cover sensitive areas such as windows, doors, outdoor electrical outlets, and light fixtures with plastic sheeting or painter’s tape to protect them from paint splatter or overspray.
- Clear driveways and parking areas – If the painters need access to driveways or parking areas, ensure that these areas are clear of vehicles and other obstructions to allow for easy access and maneuverability of painting equipment.
- Communicate with neighbors – If the worksite is near neighboring properties, inform neighbors about the painting project and request that they move any items or vehicles that may obstruct access to shared areas.
- Provide clear Access – Ensure that the painters and their equipment have access to the worksite. Remove any gates, fences, or barriers that may impede access or require special arrangements for entry.
- Schedule waste removal – Arrange to remove any waste materials or debris generated during the clearing process to maintain a clean and safe worksite environment.
Following these steps can help you effectively clear the worksite of obstructions and prepare it for exterior painting before the painters arrive, ensuring a smooth and successful painting project.
Gathering the necessary materials and tools
Materials
The correct materials for exterior painting ensure durability, protection against weather elements, and a pleasing appearance. Here is a list of essential materials and products:
- High-quality exterior primer
- High-quality exterior paint
- High-quality exterior caulk
- High-performance wood hardener
- Exterior-grade adhesive, depending on the type of surface you work on
- Patch filler, wood filler, or epoxy, depending on the type of surface you work on
- Mildewcide (for wet or humid areas or if the exterior surface has been previously affected by mold or mildew)
- Paint strippers or removers
- Detergent or surface any cleaning agent
Tools
For an exterior painting project, the right tools can make the job easier and ensure a smoother, more professional finish. Here’s a list of recommended tools:
- Power washer or pressure washer
- Scrapers and putty knives
- Sanding tools (use any):
- Sandpaper
- Sanding block
- Electric sander
- Caulking gun
- Paint application tools (use any of the three when applicable)
- High-quality paint brushes
- High-quality paint rollers and extension poles
- Paint sprayer
- Ladder or scaffold
- Drop cloths
- Plastic sheeting
- Painter’s tape
- Paint bucket and grid
- Safety gear:
- Goggles or safety glasses
- Gloves
- Dust mask or respirator
- Coveralls
- Hard hats
- Fall arrest systems such as harnesses and carabiners if working at heights
Cleaning the exterior surfaces
Cleaning the exterior surfaces is crucial before repairing, priming, and painting them. A clean and smooth surface helps the finishing paint to adhere better, leading to a long-lasting paint finish. Here are the following steps in cleaning your home’s siding:
- Inspect the walls for any damage or cracks. Repair these issues before cleaning to prevent water from seeping into the walls.
- Seal cracks and repair damaged areas to ensure a smooth surface for painting.
- Scrape off loose paint using a paint scraper or wire brush. This step is crucial for achieving a smooth surface.
- Brush down walls with a stiff bristle brush to remove dust and debris. Pay special attention to crevices and corners where dirt tends to accumulate.
- Protect your surroundings. Cover plants, electrical outlets, and light fixtures with plastic sheeting or tarps to protect them from water damage and cleaning solutions.
- If you notice mold or mildew, apply a solution of one part bleach to three parts water or a commercially available mold remover. Always wear protective gear when handling chemicals. Allow the solution to sit on the affected areas for 10-15 minutes before rinsing off thoroughly with water.
- After cleaning and washing the walls, allow them to dry completely before painting. This step may take a few days, depending on the weather conditions. Painting over damp surfaces can lead to peeling and other issues.
- Once the walls are dry inside-out, do a final inspection to ensure that dirt, mold, and loose paint have been removed and the surface is smooth and ready for painting.
For pressure-washing your home’s exterior before painting it, here are the following tips:
- Choose the correct pressure washer – Select a pressure washer with the appropriate power. Most home exteriors require a pressure washer with a PSI (pounds per square inch) of 2000-3000 is sufficient. Too much pressure can damage the surface, especially if it’s wood or delicate siding.
- Use the correct nozzle – Use a wide-angle, specifically designed for pressure-washing houses. A nozzle with a too-narrow spray can cause damage to the surface.
- Prep the area – Remove any obstacles, debris, or outdoor furniture from the area you’re planning to pressure wash. Cover delicate plants with plastic sheeting to protect them from the force of the water.
- Take safety precautions – Wear appropriate safety gear, including eye protection and sturdy footwear, when operating a pressure washer. Be cautious of electrical outlets and wires. Don’t point the pressure washer nozzle at yourself or others.
- Apply detergent – Use a mild detergent specifically formulated for pressure washing to help loosen dirt, grime, and mildew. Apply the detergent evenly to the surface and allow it to sit for a few minutes before rinsing.
- Start from the top – Starr t by washing at the top of the house and work your way down. Doing so prevents streaking as the dirty water runs down the siding. Work in small sections to ensure thorough cleaning.
- Keep a safe distance – Maintain a safe distance between the nozzle and the washing surface. This distance will vary depending on the pressure washer’s power and the surface material. Too close, and you risk damaging the surface; too far, and the cleaning may be ineffective.
- Work in sections – Divide the exterior of your home into manageable sections to ensure thorough cleaning. Slightly overlapping each section will help prevent streaking and ensure even cleaning.
- Rinse thoroughly – After applying detergent and scrubbing, thoroughly rinse the surface from top to bottom to remove all traces of dirt, detergent, and debris. Ensure there’s no detergent residue left behind, as it can affect paint adhesion.
- Allow proper drying time – Allow the exterior surfaces to dry completely before painting. Depending on weather conditions, this may take a day or two. Painting on damp surfaces can lead to poor paint adhesion and premature paint failure.
Making repairs
Repairing common siding problems requires a few steps, depending on your home’s siding type. This set of steps generally applies to siding.
- Assess the damage – Before starting any repairs, thoroughly inspect the siding to identify the extent of the damage. Determine if you need to replace entire sections or if small patches will suffice.
- Gather materials and tools – Depending on your siding type, you may need replacement panels, siding clips, nails, caulking, paint, and tools such as a hammer, pry bar, circular saw, tape measure, level, and safety gear.
- Put safety first – Always prioritize safety. Wear appropriate clothing, gloves, and safety goggles. If working at heights, use a sturdy ladder and ensure you place it on solid ground.
- Prepare the work area – Clear the area around the damaged siding and remove any obstacles. Doing so will give you ample space to work and prevent accidents.
- Remove damaged siding – Use a pry bar and hammer to remove the damaged siding carefully. Start from the top and work your way down to avoid causing further damage. Take note of any underlying issues, such as rot or mold, that may need addressing.
- Cut replacement panels – Measure the area’s dimensions that need replacement and use a circular saw or appropriate cutting tool to cut the replacement siding to size. Ensure a precise fit to maintain the integrity of the structure and appearance.
- Install replacement panels – Secure the replacement panels using siding clips or nails according to the manufacturer’s instructions. Make sure they are correctly aligned and level with the surrounding siding.
- Seal joints and gaps – Use caulking to seal any gaps or joints between the siding panels to prevent water infiltration and improve insulation. Be thorough in your application, especially around windows, doors, and corners.
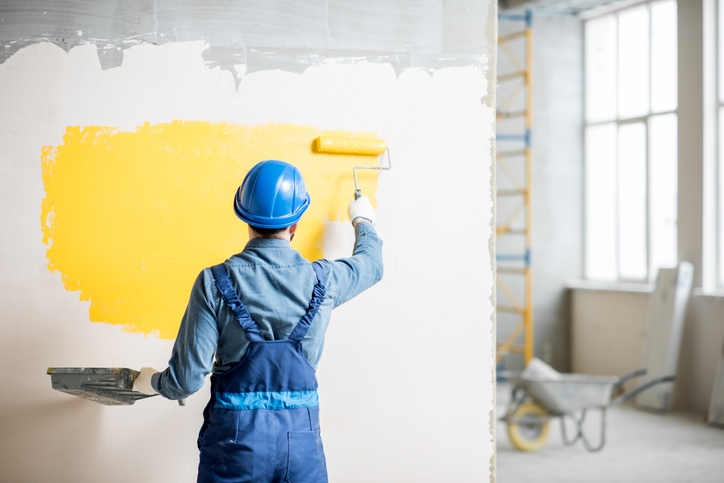
- Paint or seal – If necessary, paint the repaired area to match the rest of the siding. Doing so will not only improve the aesthetic appeal but will also provide additional protection against the elements.
- Regular maintenance – After completing the repairs, make it a habit to inspect your siding regularly for any signs of damage or wear. Addressing these issues promptly can prevent more extensive repairs in the future.
By following these tips, you can effectively repair damaged siding and maintain the integrity and appearance of your home. If you’re unsure about any aspect of the repair process, consider consulting a professional contractor for assistance.
Sanding and scraping
Sanding and scraping are also vital, especially if the surface you’re painting has existing peeling, flaky, or glossy paint. You should also do this step on uneven surfaces. The goal of scraping and sanding is to leave the surface smooth so that the finishing paint will adhere well.
Techniques for removing paint and smoothing surfaces
There are several techniques for removing old paint and smoothing surfaces, depending on the surface type and the paint layers’ extent. Here are some methods:
- Scraping is the simplest method and involves using a putty knife or scraper to remove loose or flaking paint from the surface. It’s effective for smaller areas or when dealing with paint that does not adhere to the surface.
- Sanding smoothens the surfaces and removes paint layers. Coarse sandpaper can remove thicker layers of paint, while finer sandpaper can smooth the surface. It’s essential to wear appropriate protective gear like a dust mask and goggles when sanding to prevent inhalation of dust particles.
- Chemical paint strippers are applied to the surface and work by breaking down the paint’s bond with the surface. These can effectively remove multiple paint layers or paint that is difficult to scrape or sand. However, they can be toxic and require careful handling and proper ventilation.
- Heat guns can soften the paint, making it easier to scrape away. This method can remove stubborn paint layers, but you must exercise caution to avoid scorching the surface or creating a fire hazard.
- Power washing uses high-pressure water to remove paint and clean surfaces. It suits outdoor surfaces like decks, fences, and exterior walls. However, it may not be suitable for all surfaces and can cause damage if used incorrectly.
- Chemical paint removers effectively work to dissolve paint layers. These products are often brushed or sprayed onto the surface and left to work for a specified time before being scraped away.
Before employing any of these methods, it’s essential to consider factors such as the type of surface, the existing paint’s condition, environmental concerns, and safety precautions. Additionally, proper preparation and cleanup are crucial to achieving the desired results and maintaining a safe work environment.
Safety precautions when sanding and scraping
When using removal, stripping, sanding, and scraping techniques, including chemical and heat-based methods, wear protective gear, such as gloves, goggles, and respirators, to protect yourself against harmful dust and fumes.
Each technique has advantages and disadvantages, and the best method usually depends on the type of surface you’re painting, the condition of the existing paint, and the desired finish. It’s always a good idea to first test a small and inconspicuous area to ensure the chosen method is effective and doesn’t damage the surface.
Priming your home
Benefits of applying a primer
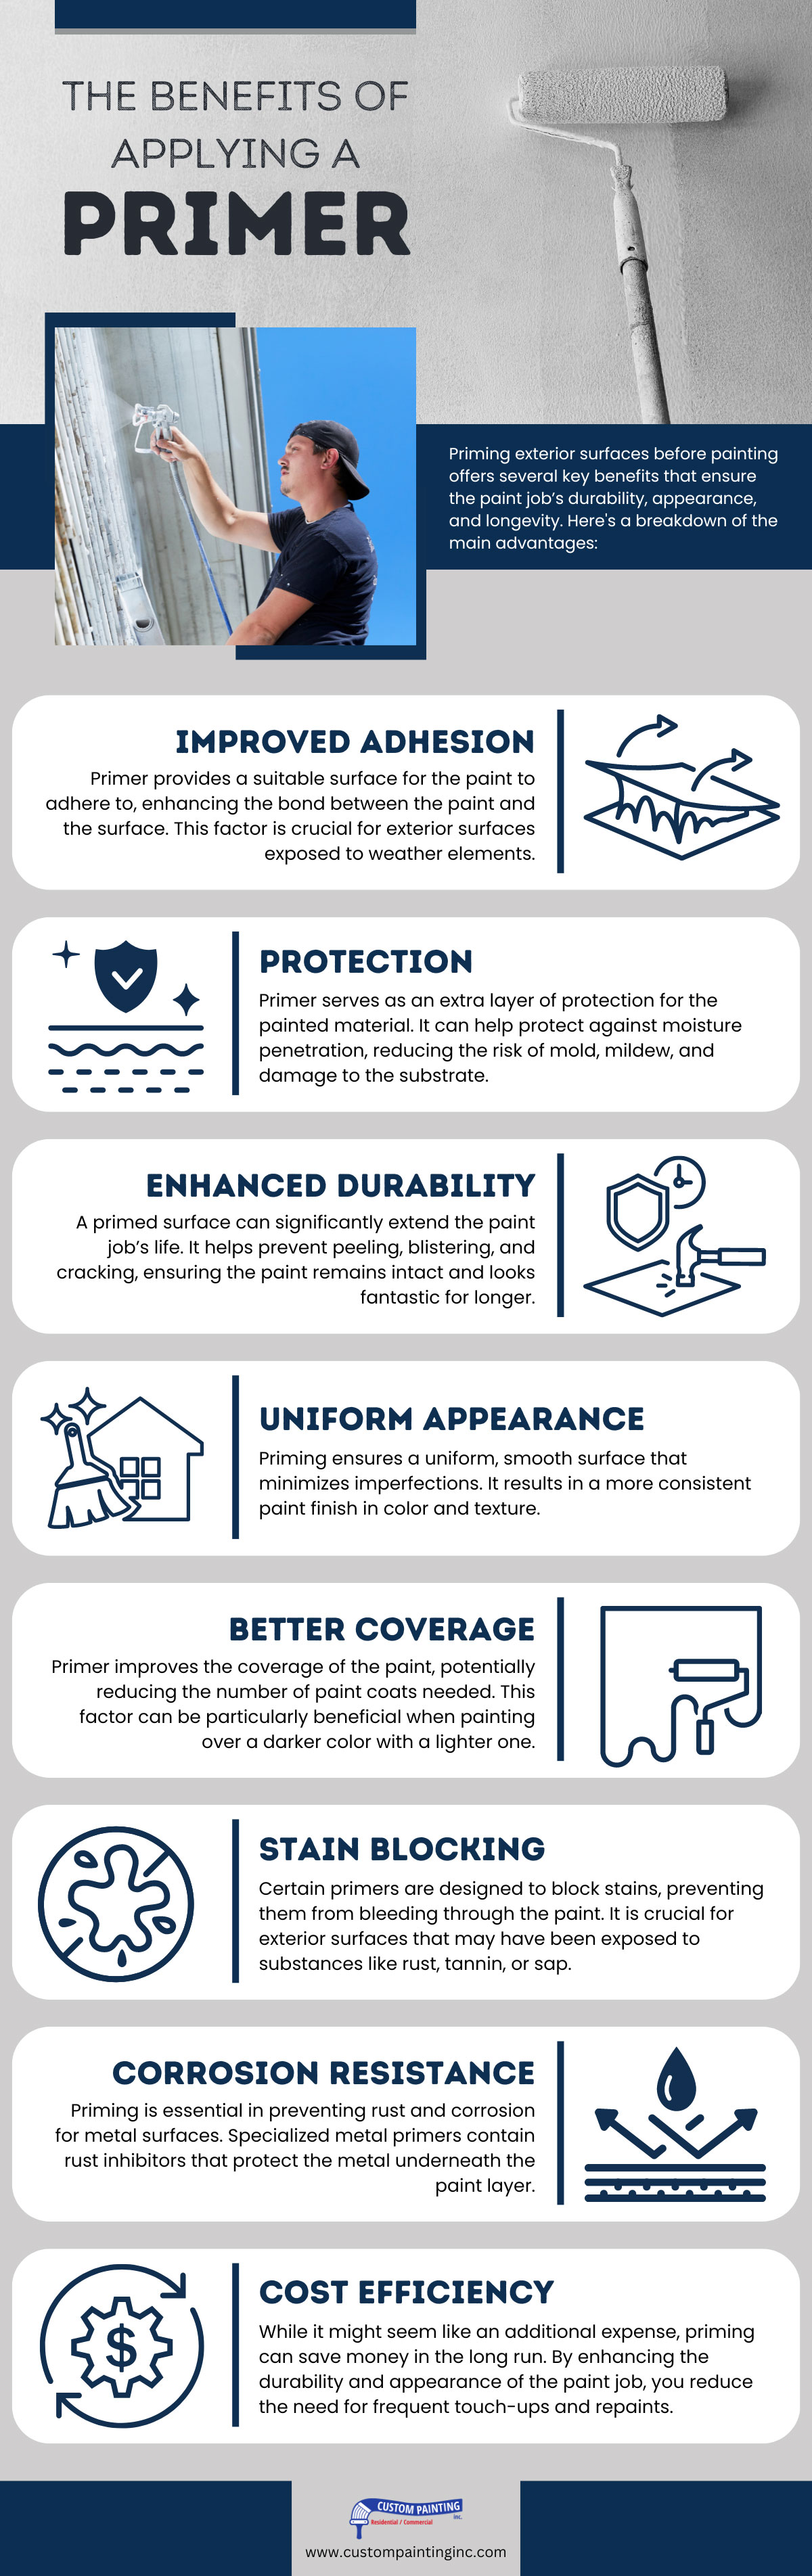
Priming exterior surfaces before painting offers several benefits:
- Enhanced adhesion – Priming creates a surface that improves the adhesion of the paint to the substrate. It helps prevent peeling, blistering, or flaking of the paint over time.
- Uniform surface – Primer helps to even out the porosity of the surface, providing a uniform base for the paint. It ensures that the final coat of paint goes on smoothly and evenly.
- Seals porous surfaces – Porous surfaces like wood or concrete can absorb paint unevenly, resulting in a patchy finish. Priming seals these surfaces, preventing the paint from being absorbed too quickly and ensuring a more consistent finish.
- Improved durability – Primers often contain additives that enhance the durability and longevity of the paint job. It can include resistance to moisture, mildew, and other environmental factors.
- Stain blocking – Certain primers can block stains from bleeding through the paint, especially on surfaces that have been previously stained or painted with dark colors.
- Cost savings – Using a primer can save money in the long run by reducing the number of coats of paint needed to achieve full coverage. It also helps extend the paint job’s life, reducing the need for frequent repainting.
- Enhanced color accuracy – Applying a primer can help achieve the true color of the paint being used, especially if the surface differs significantly from the desired final result.
Priming exterior surfaces before painting ensures a professional-quality finish. It provides a stable base for the paint to adhere to, improves the appearance of the final coat, and helps protect the surface from environmental damage.
Selection criteria for the correct primer
Many primers are on the market, but selecting the right one for your project shouldn’t be too difficult if you know what you need. Choosing the correct primer depends on several factors, including the surface material you’re painting, the environmental conditions it will be exposed to, and the type of paint you’ll use over the primer. Here are some selection criteria to consider:
- Surface material – Determine what material your exterior surfaces are made of. Common materials include wood, metal, masonry (such as brick or concrete), and synthetic materials like vinyl siding. Different types of surfaces may require different primers.
- Condition of the surface – Assess the condition of the surface. If it’s in good condition, you may only need a basic primer to help the paint adhere better and provide a uniform surface. If the surface is damaged, stained, or has other issues, you may need a specialized primer to address those issues before painting.
- Type of paint – Consider the type of paint you plan to use. Different types of paint (e.g., oil-based, latex, acrylic) may require various primers to ensure proper adhesion and durability.
- Primer types:
- Oil-based primers are suitable for bare wood, metal, and surfaces with existing oil-based paint. They provide excellent adhesion and stain-blocking properties but may take longer to dry and have a strong odor.
- Latex primers are ideal for bare wood, drywall, and previously painted surfaces with latex or acrylic paint. They dry quickly, have a low odor, and easily clean up with water.
- Acrylic primers are versatile and suitable for various surfaces, including wood, metal, masonry, and plastics. They provide good adhesion and flexibility, making them ideal for exterior use.
- Stain-blocking primers – If your surface has stains from water, smoke, or tannins (common in cedar or redwood), consider using a stain-blocking primer to prevent those stains from bleeding through the paint.
- Rust-inhibiting primers: Choose a primer specifically designed to inhibit rust formation for metal surfaces prone to rust.
- Masonry primers – If you’re painting masonry surfaces like brick or concrete, use a primer specifically formulated for these materials to ensure proper adhesion and durability.
- Special considerations – Some primers offer additional features such as mold and mildew resistance or high adhesion properties. Consider these features if they’re relevant to your project.
- Follow manufacturer recommendations – Always follow the manufacturer’s recommendations for the primer and paint you choose. They will provide specific instructions regarding surface preparation, application, and compatibility.
By considering these factors and selecting the appropriate primer for your exterior surfaces, you can ensure a successful and long-lasting paint job for your home. If you’re unsure, consult with a paint professional or the staff at your local home improvement store for personalized advice.
Masking and covering areas

When painting the exterior of a building, protecting windows, doors, and landscaping is crucial to prevent damage and ensure a clean finish. Here are some strategies for each:
Protecting windows
- Masking tape and plastic sheeting – Apply masking tape around the edges of the window frames and cover the glass with a plastic sheet or painter’s tape to prevent accidental paint splatters.
- Drop cloths – Lay drop cloths or old sheets beneath the windows to catch any paint drips or spills.
- Use sash protectors – Sash protectors are plastic or metal shields attached to windowpanes to protect them from paint. They are especially useful for multi-pane windows.
- Window film – Consider applying temporary window film to protect the glass during painting. This film can be peeled off easily once the paint is dry.
- Remove hardware – If possible, remove any window hardware, such as handles or locks, to prevent them from getting painted accidentally.
Protecting doors
- Masking tape and plastic sheeting – Similar to windows, apply masking tape around the edges of the door frames and cover any glass panels with plastic sheeting or painter’s tape.
- Remove hardware – Take off doorknobs, hinges, and any other hardware that could get in the way of painting. Doing so ensures a clean finish and prevents them from being accidentally painted.
- Drop cloths – Lay drop cloths beneath the door to catch any paint drips or spills.
- Door sweeps – Install door sweeps or thresholds to prevent paint from dripping onto the ground or damaging flooring.
- Cover thresholds – Use masking tape and plastic sheeting to cover thresholds and doorsteps to protect them from paint.
Protecting landscaping
- Trim back foliage – Trim back any bushes, shrubs, or tree branches close to the building to prevent them from brushing against wet paint.
- Cover plants – Use drop cloths or plastic sheeting to cover plants and landscaping features near the painting area to protect them from paint overspray.
- Water plants – Thoroughly water the plants around the painting area before painting. Moist soil can help protect roots from paint spills and drips.
- Use landscaping fabric – Lay down landscaping fabric around the perimeter of the building to protect the ground from paint spills and make cleanup easier.
- Mulch – Apply a layer of mulch around the building to provide an extra barrier between the paint and the soil, reducing the risk of damage to plants and landscaping features.
By following these strategies, you can help ensure that your windows, doors, and landscaping are well-protected during exterior painting, resulting in a professional-looking finish without any unintended damage.
Recommendations for effective masking materials
Effective masking materials for an exterior paint job depend on various factors, such as the painted surface, weather conditions, and personal preferences.
When selecting masking materials, consider factors such as the surface texture, exposure to weather, and the type of paint you use.
Always test a small area first, especially if unsure how the masking material will interact with the surface or paint. Additionally, ensure proper surface preparation before masking to achieve the best results.
Here are some commonly used masking materials:
- Painter’s tape – Painter’s tape is designed specifically for painting tasks. It usually has a gentle adhesive that can be easily removed without damaging surfaces. Look for outdoor or exterior-grade painter’s tape for longer-lasting adhesion, especially if exposed to weather.
- Masking film – A thin, flexible plastic sheeting that can be taped or draped over large areas to protect them from overspray. It often covers windows, doors, and other large surfaces. Ensure that it is secured well to prevent it from being blown away by the wind.
- Drop cloths – They are used to protect floors, sidewalks, or landscaping from paint splatters or spills. Heavy-duty canvas or plastic drop cloths are often used. They can be anchored down with weights or tape.
- Masking paper – Masking paper resembles regular masking tape. It can cover and protect smaller areas like trim, baseboards, or edges. It’s useful for creating clean lines and preventing paint bleed.
- Cardboard or cardstock – This option can be effective for large areas or items that must be covered. It’s available in various thicknesses and can be taped or stapled in place.
- Plastic sheeting – This option can be effective for large areas or items that must be completely covered. It’s available in various thicknesses and can be taped or stapled in place.
- Foam brushes or rollers – Sometimes, especially for intricate designs or patterns, foam brushes or rollers can be used as masking tools. Applying them directly to the surface creates barriers that prevent paint from reaching certain areas.
- Painter’s shield – Painter’s shields are handheld tools with a flat edge designed to protect adjacent surfaces while painting edges or corners. They can be made of plastic or metal and are useful for achieving straight lines.
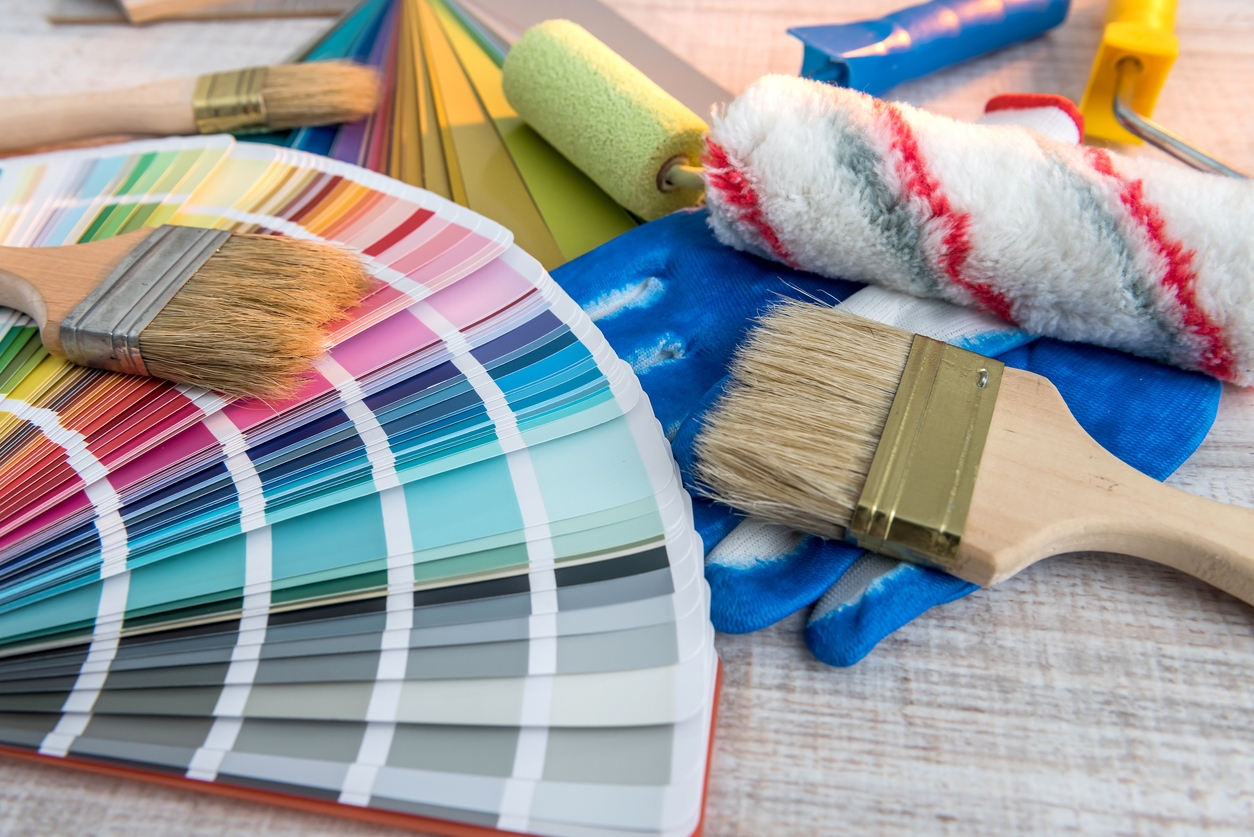
Choosing the right paint
When choosing an exterior paint for your home, several factors should be considered, including the material of your home’s exterior. Here are some key factors to keep in mind:
- Material compatibility – Different exterior materials require different types of paint. For example:
- Wood – Opt for high-quality acrylic latex or oil-based paint formulated for exterior wood surfaces.
- Brick – Choose a breathable masonry or mineral-based paint designed for brick surfaces.
- Stucco – Look for an elastomeric paint that can expand and contract with the stucco’s movement.
- Vinyl – Use a specially formulated vinyl-safe paint to prevent warping or damage to the vinyl surface.
- Durability and weather resistance – Consider the climate in your area. If you live in a region with extreme weather conditions, such as intense sunlight, heavy rain, or freezing temperatures, choose a paint that offers excellent durability and weather resistance. Look for paints with UV protection, mildew resistance, and moisture resistance.
- Color retention – Select a paint that maintains its color over time, especially if your home is exposed to direct sunlight. Paints with fade-resistant pigments or UV inhibitors can help prevent color fading and maintain the vibrancy of your home’s exterior.
- Ease of application – Choose a paint that is easy to apply and provides good coverage with minimal effort. Consider certain factors, such as the paint’s viscosity, drying time, and application method (brush, roller, or spray).
- Maintenance requirements – Some paints require more maintenance than others. Low-maintenance paints with self-cleaning properties or dirt-resistant coatings can help keep your home looking fresh with minimal upkeep.
- Environmental impact – Look for paints with low VOC (volatile organic compound) levels to minimize harmful emissions and indoor air pollution. Additionally, consider paints with eco-friendly formulations that are biodegradable and safe for the environment.
- Cost – While cost shouldn’t be the sole determining factor, it’s essential to consider your budget when choosing exterior paint. Remember that higher-quality paints typically offer better durability and longevity, potentially saving you money in the long run by reducing the frequency of repainting.
- Finish – Choose a paint finish (flat, satin, semi-gloss, or gloss) based on your aesthetic preferences and the surface’s imperfections. For example, glossier finishes are more reflective and easier to clean but may highlight surface defects, while flat finishes help hide imperfections but are less durable and harder to clean.
Paint types and their respective advantages
Paint types can be broadly categorized based on their base and finishes. Each type and finish has advantages, tailored to specific applications, durability, aesthetic outcomes, and ease of use.
Water-based paints (latex)
Advantages:
- Quick drying
- Easy cleanup
- Low levels of volatile organic compounds (VOCs), resulting in fewer fumes
- Flexible finish
- Color retention
Oil-based paints (alkyd)
Advantages:
- Durability
- Smooth application
- Excellent adhesion and surface penetration
- Longer drying time – While this seems a disadvantage, the longer drying time allows for a smoother finish, as the paint has more time to level out.
Specialized paint types
- Enamel paint provides a hard, durable finish, often glossy, ideal for surfaces that require frequent cleaning.
- Chalk paint offers a matte finish, requiring minimal surface prep, making it ideal for refurbishment.
- Milk paint is a non-toxic and eco-friendly paint that gives a rustic finish, making it ideal for antique looks.
Types of paint finishes
- Flat or matte has a non-reflective finish, making it great for hiding imperfections. However, this is the least durable finish.
- Eggshell emits a low sheen and is more durable than matte. You can use this finish for walls in living rooms, dining rooms, and bedrooms.
- Satin has a medium sheen and is easier to clean. It is suitable for kitchens, bathrooms, and high-traffic areas.
- Semi-gloss gives off a high sheen and is very durable and washable. It is ideal for trim, cabinets, and wet areas.
- High-gloss or glossy has a very high sheen and is extremely durable. It is best for surfaces that withstand abuse or require frequent scrubbing.
Challenges of painting a home’s exterior
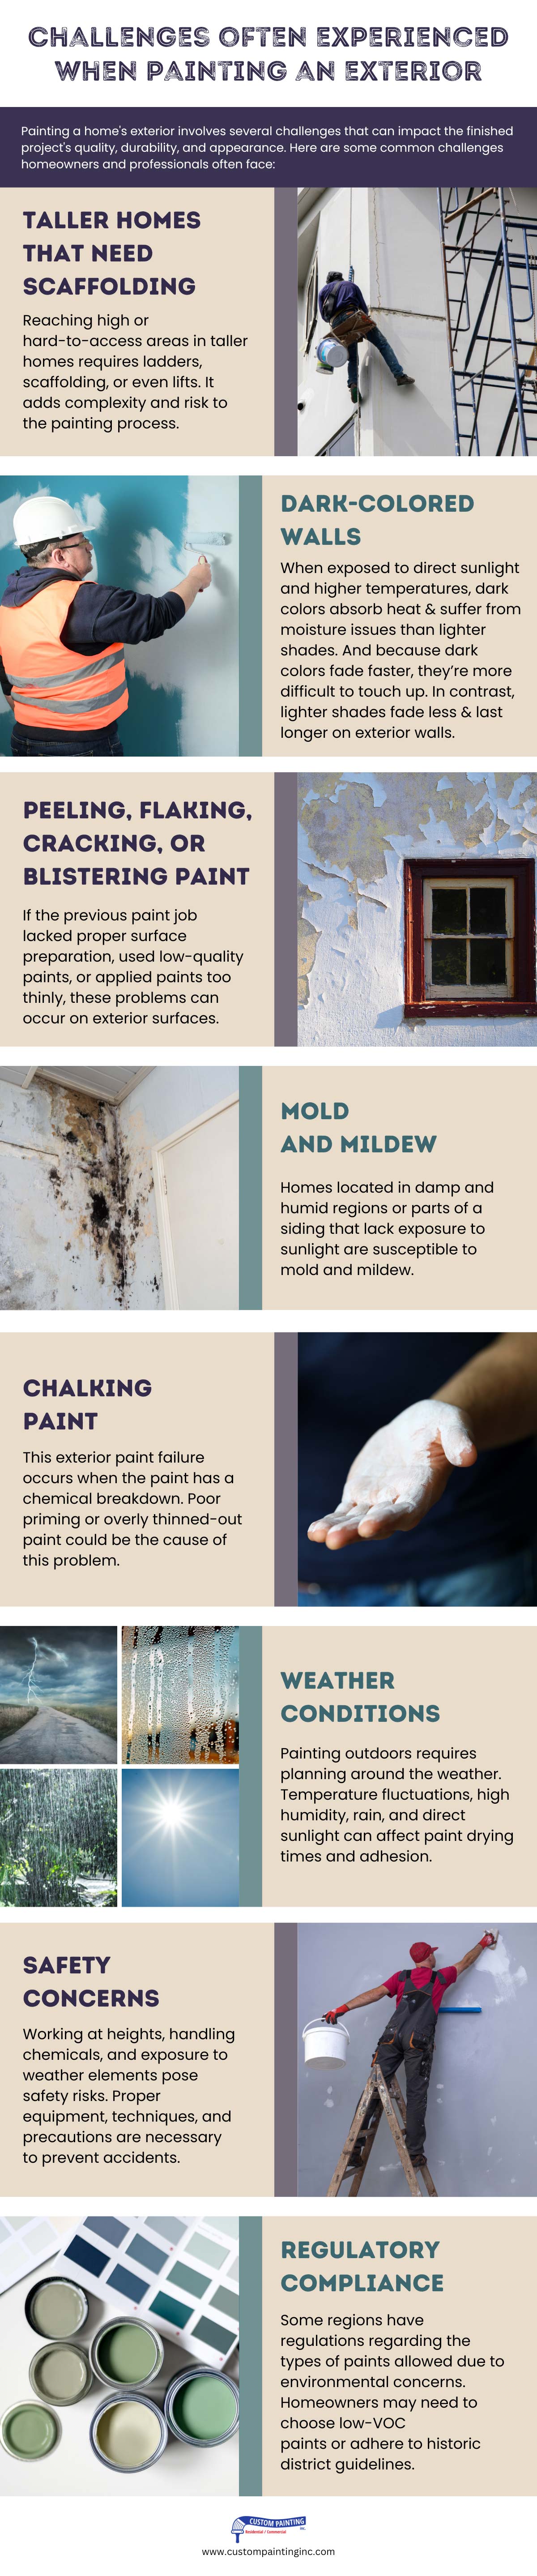
Painting a home’s exterior involves several challenges that can impact the finished project’s quality, durability, and appearance.
Here are some common challenges homeowners and professionals often face:
- Weather conditions – Exterior painting is highly weather-dependent. Rain, wind, extreme temperatures, and humidity can all affect the paint’s application and drying process, potentially leading to poor results.
- Surface issues – Surface problems, such as peeling, flaking, cracking, chalking, and blistering paint, can add to the complexity of the paint job. The more flaws the siding has, the longer it takes to finish the job.
- Time and labor – Painting a home’s exterior is a labor-intensive process that requires significant time and effort, especially for larger homes or complex architectural features. Proper planning and scheduling are necessary to ensure the project is completed efficiently.
- Taller homes – Reaching high or hard-to-access areas in taller homes requires ladders, scaffolding, or even lifts. It adds complexity and risk to the painting process.
- Color selection – Choosing the paint color for your home’s exterior can be challenging. Factors such as architectural style, surrounding environment, HOA guidelines, and personal preference all play a role. Consider how the color will look in different lighting conditions and how it will complement other elements of your property.
- Dark-colored walls – When exposed to direct sunlight and higher temperatures, dark colors absorb heat and suffer from moisture issues than lighter shades. And because dark colors fade faster, they’re more difficult to touch up. In contrast, lighter shades fade less and last longer on exterior walls.
- Safety Concerns – Painting exteriors often involves working at heights, which can pose safety risks. Safety equipment such as ladders, scaffolding, and harnesses must be used to prevent accidents.
- Cost – Exterior painting can be costly, especially if professional painters are hired. You should consider other factors like surface preparation, repairs, and any necessary permits in addition to the cost of materials and labor.
Planning your painting project
Timing and sequencing are crucial aspects of a successful paint job. Here are some best practices to consider:
- Preparation – Before starting any painting, ensure that the surface to be painted is clean, dry, and free of any debris or imperfections. This step may involve cleaning, sanding, and repairing cracks or holes.
- Priming – Applying a primer is essential, especially on bare surfaces or when transitioning between different types of surfaces. Primer helps the paint adhere better and provides a uniform base for the paint color.
- Choosing the right conditions – Painting in the right conditions can significantly affect the outcome. Ideally, choose a day with moderate temperature and low humidity for optimal drying conditions. Avoid painting in direct sunlight or extreme heat, as this can cause the paint to dry too quickly and result in poor adhesion.
- Sequencing – When painting a room or surface with multiple colors or types of paint (e.g., walls, trim, ceiling), planning the sequence carefully is essential to avoid smudges, drips, or overlaps. Generally, it’s best to start with the ceiling, move on to the walls, and finally paint any trim or accents last.
- Cutting in – Before using a roller to paint large areas, “cut in” the edges and corners with a brush. This technique ensures clean lines and prevents overlap between different colors or sections.
- Multiple coats – Numerous coats of paint may be necessary for a professional-looking finish, especially when covering a dark or uneven surface. Allow sufficient drying time between coats as per the paint manufacturer’s instructions.
- Cleanup – Properly clean your painting tools (brushes, rollers, trays) immediately after use to prolong their lifespan and ensure they’re ready for the next project.
- Patience – Allow ample time for each coat of paint to dry thoroughly before proceeding to the next step. Rushing the process can lead to mistakes and a subpar finish.
- Inspect and touch up – Once the paint has dried completely, inspect the surface for imperfections or missed spots. Touch up as needed to ensure a flawless result.
- Post-paint care – Once the paint has fully cured, consider applying a protective finish or sealer to enhance durability and longevity. Additionally, practice regular maintenance to keep the painted surfaces looking fresh.
How long does it take to prepare a home’s exterior before painting?
The average time range is 16 to 24 hours, depending on the repair needed.
How long does it take to paint a home’s exterior?
The usual answers will be:
- 1,000 to 1,400 square feet for 2 to 3 days, or
- 1,800 to 2,100 square feet for 4 to 6 days.
Custom Painting, Inc. has painted a 5,600-square feet home. Our crew tackled the project in sections so as not to disturb the family for a long period.
Considerations for weather and time of the year
The best time to do exterior painting is in mild weather, usually in spring, late summer, or early fall, depending on your location. Temperatures between 50°F and 90°F are ideal for exterior painting. On the other hand, high humidity and extreme temperatures can negatively affect the drying process.
The best time of year to do exterior painting in California mostly depends on your climate zone, given the state’s diverse weather patterns. But for most of California, the best times are during the late spring, summer, and early fall. These periods generally offer the most favorable weather conditions for exterior painting, with minimal rain and moderate temperatures.
Conclusion
Proper surface preparation is crucial for a successful exterior painting as it guarantees your finished paint job’s durability, resilience, and vibrancy. Cleaning, repairing, sanding, and priming are the keys to a durable and long-lasting paint finish.
Addressing the common challenges in exterior painting, like weather conditions and safety concerns, needs careful planning, patience, and attention to detail. Painting contractors often have the necessary skills, experience, and tools to manage these issues efficiently and effectively, making them an invaluable resource for homeowners looking for a high-quality paint finish.
Custom Painting, Inc. prides itself on having over 40 years of providing residential and commercial clients with top-notch painting, light carpentry, repair, and custom installation services in Bay Area cities. Providing you with a team of skilled, licensed, and insured painters and carpenters who understand and meet your needs is always a must. There’s no such thing as big or small projects for us because we will provide them with the quality services they need and deserve.
To learn more about paint, carpentry, repairs, and custom installation services, call Custom Painting, Inc. at 925-294-8062 or complete the online form to schedule an appointment. We always provide job estimates for free! We look forward to working with you. Serving the Bay area including the cities of Tracy, Union City, Vallejo and Walnut Creek.